One Pot Creamy Sausage Pasta

One pot sausage pasta has become a go to weekly meal for my family. If I’m being honest… the little ones won’t even eat it. BUT it makes great leftovers for Ryan and I and to pack for his lunch the next day. The good thing is I can always pull some of the pasta to the side before throwing it into the pot, and pull out some raw peppers for the kids to have with their meal since they will eat them raw but not cooked… weird, I know.

It’s pretty easy and quick to throw together as long as you have all the ingredients on hand, and it’s super creamy and delicious with cream cheese and white wine in the mix. This sausage pasta would be great for a weeknight meal, or even for entertaining, served with a light salad.

What you need to make one pot sausage pasta

Two large pots – Ok so I know it’s called “one pot sausage pasta,” but hear me out… the other pot is just to boil pasta, so I don’t really count it.

Loose sausage of choice – To make this sausage pasta I usually use the country style loose sausage from the store or a one pound bulk package from the farm near us that does pastured pork. You can use any flavor you want. I’ve made this recipe with chorizo sausage, country style or sage sausage, and it’s delicious either way.

Vegetables & Pasta – To enhance the flavor of the sausage pasta I add onion, sweet peppers, garlic, and fresh baby spinach. My favorite shapes of pasta for this dish are bowtie or shells.

White wine – I find that adding wine always brings dishes to the next level and there is no exception here! I find the white wine elevates the flavor of the sauce and makes it feel fancy for a weeknight meal. Any wine will do, just not something too sweet.

Tomato paste – I use the Cento tomato paste that comes in a tube. It has the best flavor and so easy to store for later use!

How to make creamy sausage pasta

Prep your ingredients – There really isn’t much prep for this recipe which makes it great for a weeknight meal. Before I start cooking I just chop up half an onion, 2 cloves of garlic, a whole bell pepper, and 2 cups of baby spinach. I also boil the water for the pasta. Throw the noodles in to cook as soon as the water is boiling.

Brown the sausage/sauté the vegetables – Heat a heavy bottomed pot or dutch oven over medium high heat, and put about a tablespoon of olive oil in once it’s hot. Then brown the sausage and when it’s finished remove it to a plate. Reduce the heat to medium, add a little more olive oil, and the peppers and onions. Cook them for about 4-5 minutes until the onions become translucent. Then add the garlic and cook for one more minute. Add the chopped spinach and continue cooking until it starts to wilt.

Spinach and sausage with peppers

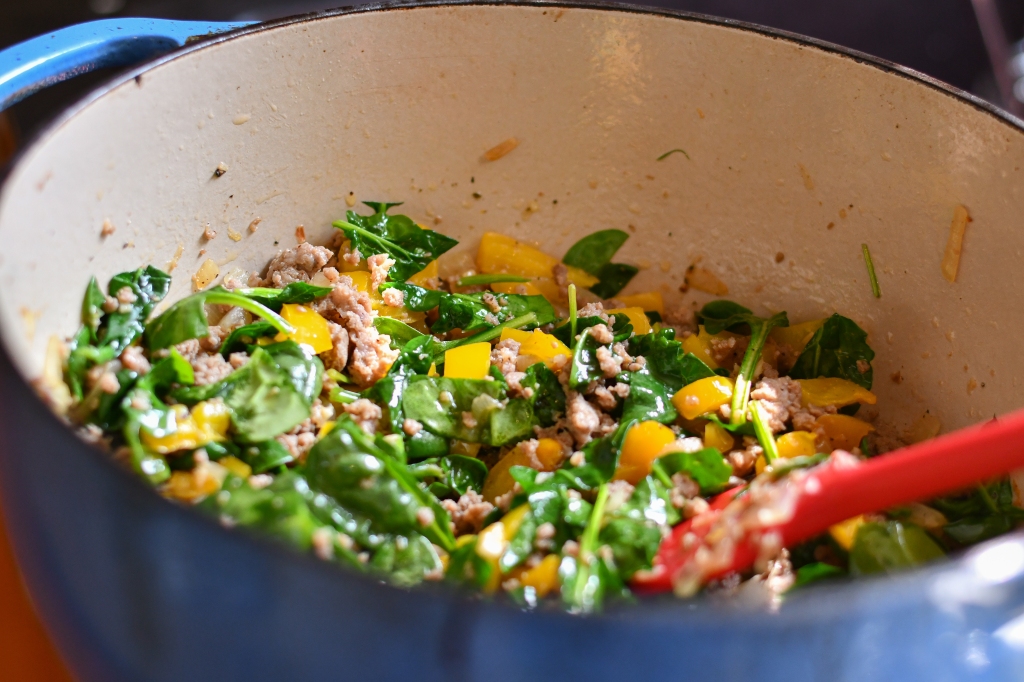
Make the sauce – The sauce for the creamy sausage pasta is made right in the pot with the rest of the ingredients, that’s what makes it so easy. Add the sausage back into the peppers, onions, and spinach, then add 2 tablespoons of tomato paste, as well as some fresh cracked black pepper. Sauté the tomato paste for about 2 minutes. Add in the white wine and mix everything together. Simmer it for about 2-3 more minutes reducing the wine a bit. Then add in the cream cheese in chunks, stirring until it melts completely. Finally add in a cup of pasta water from the boiling pasta. Let the sauce simmer for a minute to thicken it up.

Add the pasta and serve – Lastly, drain the pasta and add it all back into the pot with the sauce. Combine everything together and season with salt as needed. I always use seasoned salt. Serve it with a piece of crusty bread, or a light salad. This one pot sausage pasta is so easy for weeknight meals, and great as leftovers. Let me know in the comments if you made this and what you think! See below for a recipe card…

Creamy sausage pasta with peppers and spinach

Classic Pot Roast Recipe

This is my mom’s classic pot roast recipe and it’s the ultimate comfort meal for me. Whenever it’s rainy or cold, or just cloudy and dreary it’s the first thing I think of to make for dinner. It’s just a really warming, cozy and nourishing meal to have when it’s chilly outside.

The other thing I love about pot roast is that it always stretches into three meals at least, because you can make it into beef stew and have that for leftovers for a few days, or even hot beef sandwiches.

What do you need to make pot roast?

Meat – There are a few options of cuts you can use to make a pot roast, but I always go with a chuck roast. It has a pretty good amount of fat typically which yields a really flavorful roast. Pick one that looks nice and red and has good marbling. I try to avoid one that has a huge chunk of fat in the middle, or lots of tendons.

Veg – To go in with the pot roast we always add carrots and onions, then potatoes later. I do sometimes add celery if I have it on hand just to lend even more flavor to the meat and gravy.

Spices/herbs – I add a good amount of garlic, usually three cloves, as well as fresh thyme, bay leaves, worcestershire sauce, tomato paste, sometimes rosemary, and a rather unconventional ingredient, Italian seasoning. It’s the secret to a great pot roast, I’m convinced!

Stock – For a pot roast I go with beef stock or bone broth. I also add a cup of red wine. This can be any red wine you have on hand, but it’s necessary for that really rich, deep flavor.

Dutch oven – You can totally adapt this recipe to the InstantPot or slow cooker, but by far my favorite method of cooking a pot roast is in my heavy enameled dutch oven. It takes a long time in the oven, but I always feel the flavor ends up being better this way.

How to make pot roast

Prep your ingredients – The first thing I always do is get out all the vegetables, seasonings, herbs, equipment, etc. Then I preheat the oven to 325. Heat up the dutch oven on the stovetop to medium/high heat, and while that’s heating I start chopping the vegetables up. I just do a rough chop on the carrots, garlic, and onion and set them aside. Then I get out my herbs, tomato paste, Worcestershire, red wine, and beef stock so it’s ready when I need it.

Ingredients for pot roast

Sear the meat – One key to a really flavorful pot roast is a nice brown sear on the meat. I liberally season each side with kosher salt and freshly ground pepper, then add olive oil to the pot and sear it for about 4 minutes on each side. This makes a really great crust on the meat and adds so much flavor to the dish.

Sauté the veggies – After the meat is done searing, I remove it from the pot and turn the heat down to medium. Then add in the carrots, onions, garlic, fresh thyme, and bay leaf. I cook it for about five minutes until the onions start to turn translucent and they become fragrant. After that I add in the tomato paste and continue cooking the mixture for one more minute.

Add everything else in and throw it in the oven! – After I finish sautéing the tomato paste in with the veggies and herbs all that’s left is to pour in the wine and stock, add the Worcestershire, Italian seasoning, and pot roast with all its juices, bring the whole thing to a boil and put it into the oven with the lid on. I cook it at 325 for 2.5 hours. Meanwhile, I chop up the potatoes into bite sized pieces. After 2.5 hours I take it out, add in the potatoes and put it back in for 30 minutes. I do usually try to push the potatoes down into the cooking liquid so they take on some flavor.

Pot roast in a dutch oven

Serve – To serve, I remove the meat and veggies from the dutch oven and set them aside in a 9×13 dish for serving. Then I return the pot to the stovetop to make the drippings into gravy. I add about 2 tablespoons of flour to a small dish with an equal amount of cold water, and whisk it until there are no lumps. Then whisk this slowly into the simmering drippings until thickened. We also love to serve pot roast with a crusty loaf of bread, and this super simple recipe is my favorite.

Pot roast, potatoes, and carrots on a plate.

Let me know in the comments if you made this recipe, or what your favorite comfort food is! Hope you enjoy, and see below for a recipe card.

Recipe card for pot roast recipe

Easy Weeknight Roast Chicken

Ts there anything more comforting and nourishing than a lovely roast chicken? This roast chicken recipe is super simple, doesn’t require any rinsing or stuffing, and quick enough to put together for a weeknight meal.

I used to be so intimidated by cooking a whole bird. Now it’s almost the only way I cook chicken. My husband and I usually go for the dark meat leg quarters, the kids will go for the breast, and then I pick off the rest of the breast meat and store it for leftovers the rest of the week. If I’m feeling extra ambitious I will put the chicken carcass in the crock pot with some extra vegetables overnight for a really rich chicken stock. I always have some in my freezer!

The leftover roast chicken breast is so versatile, we love to use it for anything from sandwiches, to tacos, or even a casserole or soup the next night.

How to Make Roast Chicken

Prep the chicken and the pan: I love this recipe because there is hardly any prep required. First I chop up the veggies that will serve as the bed for the chicken to roast on. I typically use an onion and around 4-5 large carrots, peeled and roughly chopped, then toss them with some olive oil. Remove the chicken from the packaging, either discard or save the neck/giblets if your chicken has them, and place it on the bed of vegetables. I pat it dry with a couple of paper towels.

Chopped carrots and onions

Season the chicken: Sprinkle the entire chicken with some kosher salt, fresh cracked black pepper, and rubbed sage. Then I take some softened butter and coat the entire chicken.

Chicken basted with seasonings and butter

Roast the Chicken: Roast the chicken in a 425 degree oven, uncovered for around an hour and a half, give or take. After 45 minutes I usually take the chicken out and baste with lemon juice then return for the remainder of the time. How long you will need to roast it will depend on how big your chicken is. If I’m roasting a 4-5lb chicken it will typically take exactly an hour and a half. This chicken was a little over 6lbs and took 1 hour and 50 minutes. I always use a meat thermometer in the breast and make sure it hits 165 degrees.

Rest the Chicken: I always rest the chicken for at least 10-15 minutes before cutting into it to make sure all the juice doesn’t run out right away.

Photo of a roasted chicken

Serve: My kids love to have rice alongside the chicken with the carrots and onions on the side, or to make it even easier, I sometimes chop up potatoes and add them in about 30 minutes before the chicken is done roasting. Then it really becomes a one pot meal!

Tips for Making a Roast Chicken

Pick the right pan – Make sure the pan is big enough to fit the chicken, with some room for the air to circulate. For a smaller chicken I will use my dutch oven, that way I can just make gravy in the same pot right after. For a bigger chicken I will have to break out the 9×13.

You don’t need to baste – You really don’t need to baste the chicken, but I like to use lemon juice to baste halfway through because I like the flavor it adds.

Use a meat thermometer – Use the thermometer to test for doneness. This takes any guess work out of roasting a chicken, and you won’t have to worry about serving an under done chicken. Make sure it hits 165 degrees, and it will continue to cook as it rests.

Use the carcass! – In an effort to use the whole bird and have less waste, I almost always use the carcass to make a really rich chicken stock. After picking off all the extra meat and storing it, I pop the chicken carcass into the slow cooker, add carrots, onion, garlic, celery, peppercorns, turmeric, and salt. Cover the entire thing with water, and cook on low overnight. I strain it out the next day and store in the freezer. This makes the best chicken soup!

Recipe Card:

sweet potato chili

Chili with beans and sweet potatoes
Bowl of chili with beans and sweet potatoes

we’re getting into the cooler months FINALLY here in virginia, and i’m getting super excited to start getting some soups and stews on the table. i haven’t made this chili for about a year and have made some tweaks and it’s finally ready to share. i love the sweetness from the sweet potatoes to counter the spiciness from the chilis and cayenne pepper, and you can really use any ground meat. it’s great with ground turkey as well if you’re going for a lower fat option, but i’ve been making an effort to try to eat traditionally and metabolically and that includes plenty of red meat and fats. hope you enjoy it as much as we do, especially served with a buttery slice of sourdough cornbread.

ingredients

1 lb ground beef
1 medium onion, chopped
1 tbsp olive oil
2 cloves of garlic, finely minced
1 can of red kidney beans, drained and rinsed
1 large sweet potato, peeled and chopped into bite sized pieces
1 15 oz can rotel tomatoes with chilis (mild or hot, your preference)
1 8 oz can tomato sauce
2 tbsp tomato paste
1 cup water
1 tsp ancho chili powder
1 tsp cumin
1/2 tsp smoked paprika
1/8 tsp cayenne pepper
1/8 tsp nutmeg
1/8 tsp cinnamon
s + p to taste
sugar to taste (i used just a sprinkle)

instructions

heat a dutch oven to medium heat, then saute the chopped onion in the olive oil until translucent, about 3-4 minutes. add the garlic and continue cooking until fragrant, another minute. add the ground beef to the pan and brown it off, about 8-10 minutes breaking it apart as you go. season with a pinch of salt and some fresh ground black pepper. if needed, drain some of the grease if it seems like too much. add the sweet potato, canned tomatoes, sauce, water, and tomato paste, as well as the spices. bring the pot to a boil, then reduce it to a low simmer and cook partially covered until the sweet potatoes are soft, about 25-30 minutes. taste and season with more salt and pepper and a sprinkle of sugar to taste. since we used canned tomatoes, i tend to like a little sugar to offset all the acidity and spiciness from the cayenne. enjoy with sour cream, shredded cheese, avocado, or any other favorite chili toppings. we love to serve ours with a skillet of cornbread.

hearty pork stew with carrots and mushrooms

it’s soup season! perfect stew for chilly fall nights

i’m just really really excited that it’s finally getting cool enough to be acceptable to make meals like this all the time. even though i still make them in the summer, it’s so much more satisfying to sit down with a hearty bowl of stew when it’s cold outside 🙂 i used leftover pork that i made in the instant pot, but you could use raw pork and you’d just need to adjust cooking time to make sure it gets tender. this stew would also be delicious with beef, and i’d recommend a chuck roast if you’re going to go that route.

we served it over roasted garlic mashed potatoes, but you could also serve with a crusty loaf of bread, and put potatoes in the stew. it’s so versatile, and also a great freezer meal.

ingredients

1.5 lbs cooked or uncooked pork shoulder*
1 onion
2-3 cloves minced garlic
5 large carrots
8-10 oz baby bella mushrooms
1 sprig fresh rosemary
2-3 sprigs fresh thyme
3 tbsp flour
3 tbsp olive oil or butter
1.5 cups red wine
5 cups beef broth or stock (i love better than bouillon)
1 tbsp worcestershire sauce
salt and pepper to taste

instructions

cut the pork into bite sized pieces and heat a large heavy bottomed pot or dutch oven to medium high heat, add 2 tablespoons of olive oil or butter and start browning the pork in batches, making sure not to crowd the pan. meanwhile, roughly chop the onion, carrots and mushrooms, as well as the garlic if you are using whole garlic cloves. i typically use the pre-minced garlic so that saves a step.

as the pork gets brown, transfer it to a plate. i used precooked pork that i had made in the instant pot the day before, and i still browned it in the pan just to get it a little more brown and start heating it through. turn the heat down to medium once the pork is done, and add the third tablespoon of olive oil or butter and start cooking the onions and carrots. cook until the onions become translucent, about 3-5 minutes. then add the garlic, mushrooms, thyme, and rosemary, and a pinch of salt and fresh cracked pepper. cook the mushrooms down until all the liquid is released and evaporated. this took me about 8 minutes. add the pork back into the pan, mix everything thoroughly and then add the three tablespoons of flour. cook this for 2 more minutes, mixing the whole time so the flour doesn’t burn. add the red wine and boil for a minute. add the beef broth and worcestershire and bring the stew to a boil. turn it down to a simmer, and simmer partially covered for 45 minutes if using precooked pork. if you are using raw pork you will probably need to adjust your cooking time to make sure the pork gets tender, probably about an hour to an hour and a half. taste and season with salt and pepper as needed.

we served the stew over roasted garlic mashed potatoes, but you could easily enjoy this with a nice crusty loaf of bread, add potatoes into the stew, etc. it’s really easy and versatile. hope you enjoy!

*for my instant pot pork shoulder, i used a large boneless pork shoulder, cut it into four pieces and removed the larger pieces of fat. then i seasoned with kosher salt and fresh cracked black pepper, browned it over high in a large dutch oven and pressure cooked on manual with chicken broth, onions, thyme, rosemary, and garlic for 45 minutes until it was falling apart tender. i turned the cooking liquid into gravy and we had this the night before i made the stew.

chicken and wild rice soup

chicken and wild rice soup with mushrooms and spinach

Chicken and wild rice soup with mushrooms and spinach.

this chicken and rice soup has quickly become one of my family’s favorites, and it’s one of my go-to freezer meals. this recipe makes a huge pot of soup and you could easily eat it for dinner, have leftovers, and still have some to stash away in the freezer. i originally made this as a vegetarian soup with just mushrooms, and of course my husband had to make a “where’s the meat?” comment, so i added chicken. equally delicious either way. i always enjoy a good vegetarian meal, but he usually expects meat for dinner. my kids also could take or leave meat, and both love mushrooms so this works both ways for us. you can also use any chicken meat you have leftover or sitting around in the freezer. let me know if you try this recipe, and what you prefer; chicken and wild rice or mushroom and wild rice?

ingredients

2 cups of precooked chicken*
1 medium onion, diced
2 cloves of minced garlic
3-4 medium carrots, diced
2 ribs of celery, thinly sliced
8 oz baby bella or white button mushrooms, sliced
3/4 cup wild rice
1/2 cup jasmine rice
2-3 sprigs fresh thyme
1 teaspoon chopped fresh rosemary
1 bay leaf
8-10 cups chicken broth
1 cup white wine
2 tablespoons all purpose flour
2-3 cups fresh baby spinach – chopped or torn into pieces
2 tablespoons olive oil
salt and pepper to taste

instructions

normally i pre-chop all my vegetables/herbs before starting a recipe like this so i’m prepared when i need to add something in. so first, cut or shred up your chicken and set aside. chop carrots, onions, and celery and set aside. slice mushrooms and set aside. if you are mincing your own garlic, do that now as well and put it with the mushrooms, these will be added together.

heat a large dutch oven over medium heat and add the two tablespoons of olive oil. saute the onions, carrots, and celery with a large pinch of salt and pepper until the onions start to become translucent, then add the mushrooms and garlic. continue cooking this mixture until the mushrooms have released all their liquid and it starts to evaporate. at this time add the rosemary, thyme, and bay leaf, and add the chicken back in. once everything is heated through, about 2 minutes, sprinkle the two tablespoons of flour, and continue cooking the mixture for 2 more minutes. pour over the wine, chicken broth, and add the rice. make sure everything is combined and bring this to a boil. reduce the heat to low and simmer it partially covered for 45 minutes, or until the rice is fully cooked. check and stir the soup to make sure the rice isn’t sticking to the bottom, or you need to add more liquid. i usually start with 8 cups of broth, and if it seems like the rice has absorbed all the liquid or it’s sticking to the bottom, i add the additional 2 cups. once the rice is completely cooked through, you can then add in the spinach and simmer for about 5 more minutes until it’s heated through.

serve with croutons, or a nice crusty sourdough loaf like we do 🙂 hope you enjoy this soup as much as our family does!

*note about chicken – you could also use two fresh chicken breasts. if using this method, cut the chicken breasts into bite sized pieces, and brown them in the dutch oven over medium high heat with 2 tablespoons of olive oil in two batches, then set aside on a plate before starting to saute the vegetables. add them back in when you add in the herbs. i have made this recipe with chicken breasts using this method as well as chicken thighs that i had already precooked in the instant pot. a rotisserie chicken would also work really well.

5 easy meals for toddlers and busy moms

my favorite 5 easy meals to feed my kids when i’m feeling lazy

everyone knows feeding toddlers can be tedious. compound that with my husband being deployed last year, multiple trainings away from home, dealing with covid, and living 2500 miles away from any family. and despite loving to cook (i definitely don’t shy away from a complicated meal), i still feed my kids super simple easy meals when i just feel burnt out from being in the kitchen, or even when i know they won’t like what i’m eating for dinner. here are the five easy meals i find myself going back to over and over.

1. dino nuggets for the win!

easy meals for toddlers

i mean… who doesn’t love a good dino nug? i literally microwave them and usually serve with steamed fresh broccoli and some kind of fruit. always a hit, and so so easy especially for lunch. also, i haven’t been able to find these in california but my friend turned me onto these perdue plus chicken and vegetable dino nuggets… they are so delicious and it makes me feel better knowing they are getting a serving of veggies as well.

2. 3-ingredient naan pizza

this is one of our new favorites. all the ingredients come from aldi and it is so so easy. just take a piece of their naan bread, spread on some marinara, cover in shredded mozzarella, and bake at 400 degrees for 10 minutes. comes out perfect every time, and i love it just as much as them. another version is to use premade bbq sauce instead of marinara, top with shredded chicken, mozzarella and finish with pickled red onions. easy bbq chicken pizza!

3. pb&j… a classic

simple and self-explanatory. my one year old actually prefers grilled cheese, but my 2.5 year old is team pb&j all day. we’ve been using the organic unsweetened peanut butter from aldi, and my kids don’t even notice the difference between that and the kind that has added oils and sugar.

4. chicken sausage

this is mostly for my 2.5 year old… the one year old won’t eat meat at all unless it’s a chicken nugget. these chicken sausages come from aldi and they have three flavors. our favorite is the apple sausage, but we also love the spinach feta, and my husband likes the italian. they’re precooked, so super easy to heat up for a quick lunch ror dinner. i will also be posting a skillet dinner i made with the spinach feta flavor that was delicious! i also love that they don’t have nitrates or any weird ingredients that you can’t pronounce.

5. cheese and crackers!

usually we’d think of cheese and crackers as a snack, but there isn’t any reason why we can’t have it as a meal. if my one year old won’t eat anything else, i know she will always eat sliced cheese. cheese has plenty of protein, and there is virtually no prep. my 2.5 year old likes the sharp cheddar from aldi, but sometimes i will even just give them presliced sandwich slices and they love that too. serve it with some steamed veggies or avocado and a fruit and you have a whole meal with hardly any cleanup.

let me know the easy meals you love to feed your little ones!

feeling spring – shepherd’s pie

shepherd’s pie with cheesy mashed potato topping, served with irish soda bread

picture of shepherd's pie
bowl of shepherd's pie
picture of irish soda bread

i literally forgot about st. patrick’s day this year until my sister reminded me, but happened to test this recipe last week for shepherd’s pie, so i was unexpectedly prepared for this! i did do late night baking last night so i would at least have the soda bread ready for the kids breakfast in the morning. i used this recipe for my soda bread from sally’s baking addiction and it was delicious and easy. the only thing i was missing was buttermilk, so i used her substitution of vinegar with 2% milk, and that worked just fine.

i used to loveeeee st. patricks day because that meant i got my favorite meal… corned beef and cabbage, haha! i would even ask my mom to make it on my birthday so i would get it twice in march. but with two little ones, i really can’t be bothered to boil corned beef for hours, and i already had all the ingredients for this shepherd’s pie in my fridge/freezer. the best thing about this recipe as opposed to corned beef and cabbage is it’s a great freezer meal! shepherd’s pie can be frozen before or after baking, and tastes just as good out of the freezer as it did on day one. plus, both my kids love it. if you give it a try, let me know what you think in the comments. happy st. paddy’s day everyone!

ingredients

meat filling
1 lb ground beef (i use the organic grass fed ground beef from aldi)
1 cup beef broth
1/2 cup red wine
1 tablespoon butter or olive oil
about 1 cup finely chopped yellow onion (i used 1/2 a large onion)
2 cloves minced garlic
2-3 sprigs of fresh thyme
1 bay leaf
1 teaspoon dried parsley
1/2 teaspoon salt
1/2 teaspoon freshly ground black pepper
1 tablespoon worcestershire
2 tablespoons tomato paste
2 tablespoons flour
1 1/2 cup frozen mixed vegetables

potato topping
1 1/2-2 lbs potatoes – i used 6 small russet potatoes, or you could use 2-3 large potatoes
4 tablespoons unsalted butter
4 oz cream cheese
1/3-1/2 cup 2% or whole milk – i start with a third of a cup and add more if needed. you want this to be stiffer than traditional mashed potatoes
salt to taste – i start with a small amount, because we’re also adding cheese and cheese is salty!
1/4 teaspoon fresh ground black pepper
3/4 – 1 cup grated cheddar cheese

instructions

peel the potatoes, but them into bite sized chunks, and put them in a large pot covered with cold water. turn burner on high and bring them to a boil, then cook them for about 8-10 minutes until fork tender. set a timer if you need to so you don’t forget about them while you’re cooking the filling! preheat oven to 400 degrees. meanwhile, in a heavy bottomed skillet or dutch oven, melt the tablespoon of butter or olive oil over medium high heat and start browning the ground beef. once it’s all the way browned, check how much grease came off the meat. you may need to drain some if it looks too greasy! lower the heat to medium, then add your chopped half an onion and 2 cloves of minced garlic. cook until the onion becomes translucent, and add in the 1 1/2 cups of frozen mixed veggies. cook this until the veggies lose their chill, 2-3 minutes, and then add the thyme, bay leaf, worcestershire, 2 tablespoons of tomato paste, and 2 tablespoons of flour. continue cooking this mixture for about 2 minutes, stirring continuously so the flour doesn’t burn to the bottom. then pour in the beef stock/broth and wine. bring to a boil, and reduce to a simmer for about 6-7 minutes. remove the bay leaf and thyme sprigs.

drain your potatoes once they’re done and return to the pot with the burner still on low. start mashing the potatoes with the burner on to get all the liquid out of the potatoes. add the butter, cream cheese, salt, pepper, and grated cheddar. mash until combined and turn the burner off. i also sometimes add a little seasoned salt to taste if it feels like they’re missing something.

assemble the shepherd’s pie in a 9 inch pie plate by layering the meat mixture on the bottom and potatoes on top. bake at 400 degrees, uncovered for about 35-40 minutes, or until the top is golden brown and the filling is bubbly. be careful when baking, if your dish is very full to put a sheet pan under the pie plate, because i’ve had filling run out all over my oven before! enjoy with soda bread and a guinness or glass of red wine 🙂 happy st. paddy’s day! ps. check out my very first cook with me video on youtube to see the exact method i used for this recipe!


restaurant-style at home

bbq beef flatbread with pickled onions and guacamole

i’ve been dreaming about something similar to this ever since i got a pulled pork pizza with guacamole at a restaurant we visited in tampa when i was pregnant with emmett. it was so good that i finished all the leftovers when we got home that night… this recipe is easy in that you just throw the beef in the instant pot and let it do its work. there are a few steps, and you can always skip the onions and DEFINITELY use store bought guacamole if that’s your thing. i would recommend not skipping the onions though because to me, they make it 🙂 you can check out my reels on instagram for my method! i always use this recipe for quick pickled red onions from cookie + kate, and i love them. you can use them on burgers, tacos, flatbreads, quesadillas, etc. and they always add that little extra something. the barbecue sauce recipe is a modified version of this one from south your mouth, and this is the recipe and method i use every time i make barbecue chicken. always a hit with the family. and no need to fire up the grill. you will see i have modified a few of the ingredients to get a more barbecue flavor and leave out the spice since i have littles eating it. josie refuses to eat meat, but emmett loved this beef and equally likes the barbecue chicken. hope you enjoy this as much as we did!

ingredients

2-3 lb chuck roast, cut into 4 equal pieces
half a beer – any kind, i used sapporo because that’s what i had in the fridge
your favorite homemade or storebought guacamole recipe
storebought flatbread or naan
storebought bbq sauce
shredded cheese, any kind
bbq sauce
1/3 cup honey
1/4 cup ketchup
2 tablespoons soy sauce
2 tablespoons apple cider vinegar
1 tablespoon minced garlic
1 tablespoon worcestershire
1 tablespoon yellow mustard
pickled onions
1 red onion, thinly sliced
1/2 cup water
1/4 cup white vinegar
1/4 cup apple cider vinegar
1 1/2 tablespoons honey
1 1/2 teaspoons sea salt or kosher salt
1/4 teaspoon red pepper flakes

instructions

mix up the barbecue sauce by whisking together the honey, ketchup, soy sauce, apple cider vinegar, garlic, worcestershire, and mustard. cut the chuck roast into four equal pieces, then heat a non stick pan to high heat, and sear the meat on all sides until brown and crusty, about 3-4 minutes per side. you could also do this on the sauté setting on your instant pot, but i find it doesn’t work as well or as fast as just doing it on the stovetop. place the meat into the instant pot along with the barbecue sauce and half the beer, just to add more cooking liquid. set on manual setting for 50 minutes. meanwhile, slice up your red onions and place them in a glass bowl or large jar. heat the water, vinegars, honey, salt, and red pepper flakes in a small pot over medium heat until everything is dissolved and the liquid is simmering. pour over the red onions and let it cool at room temp for at least 30 minutes. also if you are making your own guacamole, do this now! preheat your oven to 425. when the meat is finished, let the pressure release naturally for at least ten minutes, then you can manually release it. using two forks, shred the meat, and remove the larger chunks of fat. i usually don’t remove it beforehand because i’m lazy… put together your flatbread by spreading some of the storebought bbq sauce on your flatbread, arrange the beef and top with shredded cheese. place right on the oven rack until the cheese is melted and the bottom of the flatbread is a little crusty, about 7-10 minutes. keep your eye on it! then, remove it onto a pan using a fork and top with the pickled red onions and guacamole. cut into pieces and enjoy as an app, game day snack, or meal!

restaurant-style at home – bbq beef flatbread

bbq beef flatbread with pickled onions and guacamole

Picture of bbq beef flatbread with pickled onions and guacamole

i’ve been dreaming about something similar to this ever since i got a pulled pork pizza with guacamole at a restaurant we visited in tampa when i was pregnant with emmett. it was so good that i finished all the leftovers when we got home that night… this bbq beef flatbread recipe is easy in that you just throw the beef in the instant pot and let it do its work. there are a few steps, and you can always skip the pickled onions and DEFINITELY use store bought guacamole if that’s your thing. i would recommend not skipping the onions though because to me, they make it 🙂 you can check out my reels on instagram for my method! i always use this recipe for quick pickled red onions from cookie + kate, and i love them. you can use them on burgers, tacos, flatbreads, quesadillas, etc. and they always add that little extra something. the barbecue sauce recipe is a modified version of this one from south your mouth, and this is the recipe and method i use every time i make barbecue chicken. always a hit with the family. and no need to fire up the grill. you will see i have modified a few of the ingredients to get a more barbecue flavor and leave out the spice since i have littles eating it. josie refuses to eat meat, but emmett loved this beef and equally likes the barbecue chicken. hope you enjoy this as much as we did!

ingredients

2-3 lb chuck roast, cut into 4 equal pieces
half a beer – any kind, i used sapporo because that’s what i had in the fridge
your favorite homemade or storebought guacamole recipe
storebought flatbread or naan
storebought bbq sauce
shredded cheese, any kind
bbq sauce
1/3 cup honey
1/4 cup ketchup
2 tablespoons soy sauce
2 tablespoons apple cider vinegar
1 tablespoon minced garlic
1 tablespoon worcestershire
1 tablespoon yellow mustard
pickled onions
1 red onion, thinly sliced
1/2 cup water
1/4 cup white vinegar
1/4 cup apple cider vinegar
1 1/2 tablespoons honey
1 1/2 teaspoons sea salt or kosher salt
1/4 teaspoon red pepper flakes

instructions

mix up the barbecue sauce by whisking together the honey, ketchup, soy sauce, apple cider vinegar, garlic, worcestershire, and mustard. cut the chuck roast into four equal pieces, then heat a non stick pan to high heat, and sear the meat on all sides until brown and crusty, about 3-4 minutes per side. you could also do this on the sauté setting on your instant pot, but i find it doesn’t work as well or as fast as just doing it on the stovetop. place the meat into the instant pot along with the barbecue sauce and half the beer, just to add more cooking liquid. set on manual setting for 50 minutes. meanwhile, slice up your red onions and place them in a glass bowl or large jar. heat the water, vinegars, honey, salt, and red pepper flakes in a small pot over medium heat until everything is dissolved and the liquid is simmering. pour over the red onions and let it cool at room temp for at least 30 minutes. also if you are making your own guacamole, do this now! preheat your oven to 425. when the meat is finished, let the pressure release naturally for at least ten minutes, then you can manually release it. using two forks, shred the meat, and remove the larger chunks of fat. i usually don’t remove it beforehand because i’m lazy… put together your flatbread by spreading some of the storebought bbq sauce on your flatbread, arrange the beef and top with shredded cheese. place right on the oven rack until the cheese is melted and the bottom of the flatbread is a little crusty, about 7-10 minutes. keep your eye on it! then, remove it onto a pan using a fork and top with the pickled onions and guacamole. cut into pieces and enjoy as an app, game day snack, or meal!